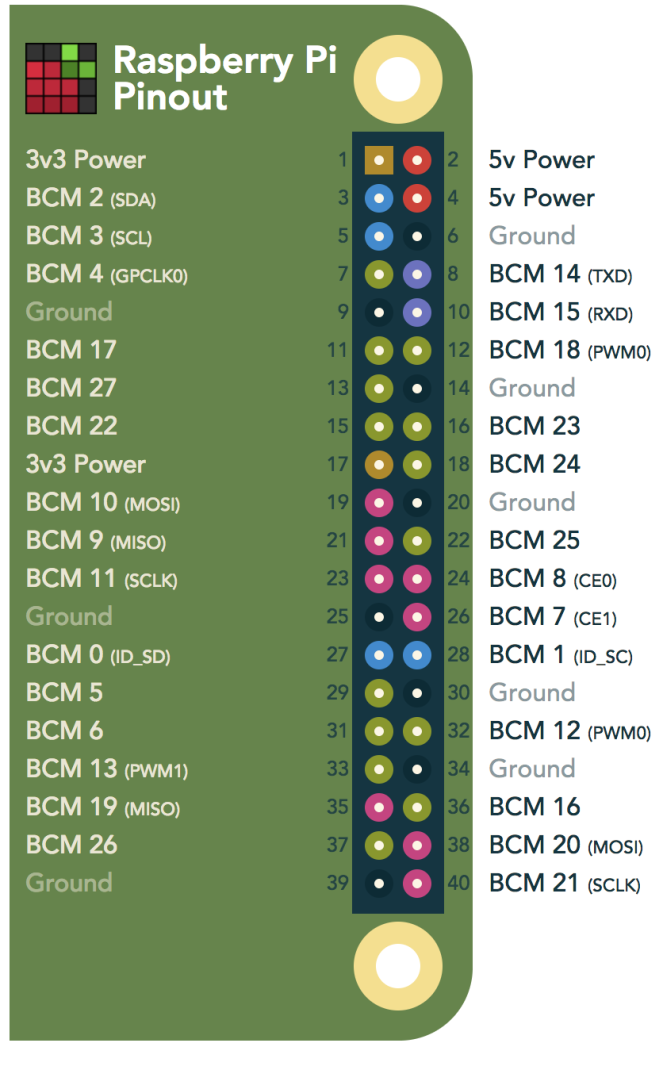
Pinout
I2C
- Run
sudo raspi-configto enable i2c. ls /dev/*i2c*should give/dev/i2c-1sudo apt-get install -y i2c-tools- install command-line utility programs.i2cdetect -y- list all devices on the bus
pi@raspberrypi:~/$ i2cdetect -y 1
     0  1  2  3  4  5  6  7  8  9  a  b  c  d  e  f
00:          -- -- -- -- -- -- -- -- -- -- -- -- --
10: -- -- -- -- -- -- -- -- -- -- -- -- -- -- -- --
20: -- -- -- -- -- -- -- -- -- -- -- -- -- -- -- --
30: -- -- -- -- -- -- -- -- -- -- -- -- -- -- -- --
40: -- -- -- -- -- -- -- -- -- -- -- -- -- -- -- --
50: -- -- -- -- -- -- -- -- -- -- -- -- -- -- -- --
60: 60 -- -- -- -- -- -- -- -- -- -- -- -- -- -- --
70: -- -- -- -- -- -- -- --
1 Wire
Mainly copied from https://pinout.xyz/pinout/1_wire
To enable the one-wire interface add the following line to /boot/config.txt
dtoverlay=w1-gpio
or
dtoverlay=w1-gpio,gpiopin=x to use a custom pin (default is BCM4).
Alternatively the one-wire interface can be enable on demand using raspi-config, or the following:
sudo modprobe w1-gpio
Newer kernels (4.9.28 and later) allow you to use dynamic overlay loading instead, including creating multiple 1-Wire busses to be used at the same time:
sudo dtoverlay w1-gpio gpiopin=4 pullup=0  # header pin 7
sudo dtoverlay w1-gpio gpiopin=17 pullup=0 # header pin 11
sudo dtoverlay w1-gpio gpiopin=27 pullup=0 # header pin 13
ls /sys/bus/w1/devices/
n.b. Using w1-gpio on the Raspberry Pi typically needs a 4.7 k? pull-up resistor connected between the GPIO pin and a 3.3v supply.